DIY hanging toy storage to organize the stuffed animals
In today'due south post: Go all those stuffed animals organized with this easy DIY hanging toy storage system.
Anyone else drowning in toys? We really don't purchase the kids that many toys, just they receive them equally gifts and inherit them from cousins and save up their ain money to buy special ones…and we've ended up with So MANY STUFFED ANIMALS! And of course each stuffed animal is absolutely loved and cherished then it's pretty difficult to convince the kids we should donate some of them. The kids merits they'll keep them cleaned upward on their beds, but it just doesn't happen, and I'm about to lose my mind.

Or I was. I spent some time hunting for a good stuffed fauna storage organisation. I've seen hammocks which hang in a corner of the room (won't piece of work because there's no free corner in their sleeping accommodation) and large custom built stuffed animal zoos ($200+) and bookshelves with dowels running down the front end and so kids tin stuff all their toys inside (information technology keeps them off the ground, just looks near but as messy). I finally came upward with a DIY blimp fauna storage solution that is pretty inexpensive and can be easily put together in an hour or two. It'southward elementary enough that the kids can help with most of the construction.
***Delight Annotation: This swing is Non suitable for use in your dwelling if you have babies or toddlers as information technology could pose a choking run a risk if small children are left unattended most it. DO NOT make or employ this system unless your youngest children are sometime plenty to know never to climb on it, and never leave a small child unattended near this or whatsoever other item that has cords which hang from the ceiling.***

DIY Hanging toy storage
Now, I probably wouldn't put one of these in a toddler's bedroom since the temptation to climb on it daily might exist besides much to resist. But my boys are older – they're in that stage where they don't really play with stuffed animals much, simply they aren't ready to requite them up. Then for them, the blimp beast swing works perfectly. Each boy has a shelf, and each shelf fits eight Build-a-Bear sized animals easily, with room for a few more smaller ones stuffed in. The boys know they can go along as many animals as volition fit on their shelf, which is going to brand it like shooting fish in a barrel to know when it's fourth dimension to de-clutter and donate a few.

Before nosotros get to the how-to, I merely want to make a note: similar anything that hangs from the ceiling with rope or string, this could be a strangulation hazard if an unattended young child climbs on it. Do non put one of these in the bedroom of a very small child, and use your expert judgment when building i for an older child if you lot have small children in the home – thank you!
How to build a hanging toy storage system
Supplies:

Y'all'll need the supplies pictured above, plus forest gum and a drill (a staple gun is optional).
For a tri-level swing, you'll demand 6 4in wide by i/4in thick by 2ft long hobby precuts, about thirty ft of rope, two hooks that can screw into ceiling studs, and v 4ft wood laths. Look for the precut wood in the "hobby wood" section, and forest lath somewhere in the pine boards department at Dwelling Depot. The hobby precuts are a couple of dollar each, and the forest lath is about 50 cents each (pick the lath carefully, looking for ones that are directly and have minimal knots).
Kickoff construction by sanding your woods. The hobby precuts volition need minimal sanding, simply the forest board will need more.
Next, cut your wood lath. For each level y'all need 2 2-ft lengths and two i-ft lengths.
Lay two of the hobby precuts down on the footing with near 2-3 inches betwixt them, as shown below. Utilize wood mucilage to glue a 1-ft length of lath on each end of the hobby precuts, as you see below. Make sure the lath piece extends a bit off to the side of each precut.
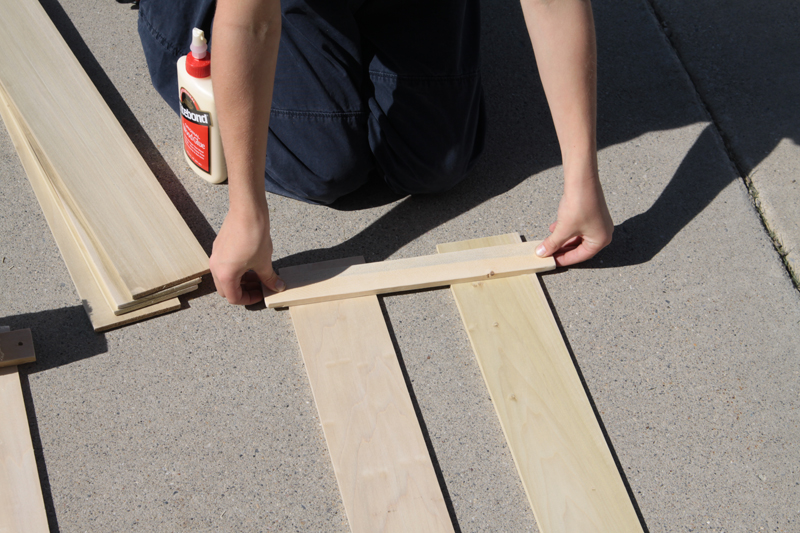
Glue together the swing seats for each level (clamp together or lay something heavy on each lath while the glue dries) and allow dry completely. And so you'll drill a hole big enough for your rope to get through on each stop of the board pieces. In the photo above, the hole would go correct where the boy's thumb is on the right.
In the photograph below you tin see how the swing is put together. Cut 4 lengths of rope – 8 feet is probably plenty, but this will depend on how loftier your ceiling in in the room y'all want to hang this swing and how low you want it to hang. Put a knot at 1 finish of the rope, and so thread information technology through the swing seat. Identify another knot right on top of the swing seat. About four inches in a higher place the swing seat wrap the rope around a 2-ft piece of lath, which acts as the swing bar. Either knot the rope or secure with staples.
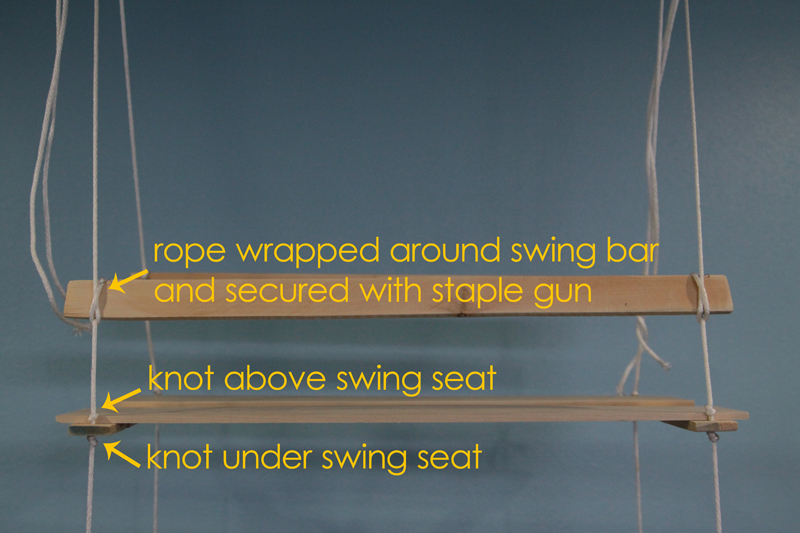
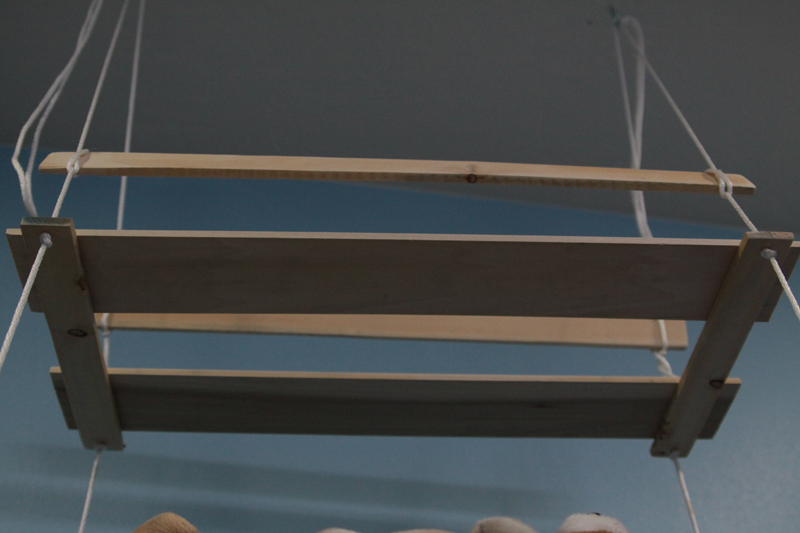
My swing seats are space about eighteen inches apart, but you can make them as close together or far apart as you'd like. But repeat the process to add the next level. When you're done, knot the ropes together on each side and hang from hooks that you've screwed direct into studs in the ceiling. Here'south a view of the top swing seat from below to give you lot a ameliorate idea of what it looks like finished:
Non also hard and non too expensive – and now all the stuffed animals are off the floor and out of the style! Now that all the blimp animals are comfortably ensconced on the hanging toy storage swing, we can vacuum the flooring without having to clean upwardly first. Now if we can merely get the legos organized as well…

Reader Interactions
Source: https://www.itsalwaysautumn.com/stuffed-animal-swing-diy-hanging-toy-storage.html
0 Response to "DIY hanging toy storage to organize the stuffed animals"
Post a Comment